Showing posts with label Art. Show all posts

Saturday, October 5, 2013

Bring Coloring Pages to Life in 3D with ColAR Mix App!

Leave a Comment
Recently, I stumbled upon this cool website/app called http://colarapp.com/ .  You need to check it out.  Kids can turn a picture into 3D art with a mobile phone or iPad.  1) You print a coloring page from the website. 2) Kids color the page in crayon or colored pencil (markers don't seem to work).  3) You or their parents download the ColAR Mix App onto mobile phone or iPad.  4) Using the App, you take a
picture of the colored page.  5) Voila!  The kid's colored page comes to life in 3D!

I think it's awesome for all ages.  It promotes fine motor skills and technology at the same time!  And if you're creative enough, you can implement it into your curriculum.  


I tried the bird and worm coloring page with my first graders, as it corresponds with our animal theme in science.  My students loved it!  

Enjoy!
Read More...

Sunday, September 1, 2013

Recite.

Leave a Comment

Okay, so if you are about making posters of quotes then this is the site for you!  Recite is where you can "turn a quote into a masterpiece."  Pretty neat.  You can type just about anything and they have a plethora of backgrounds and cool fonts that will create your quote into something awesome!
Read More...

Monday, July 30, 2012

3-D Fine Motor Art

Leave a Comment

The Mailbox is the best!  They always have fun activities to share and I'm passing it on to you!

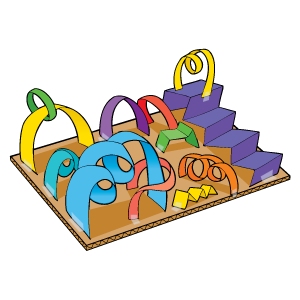
Colorful Craft: 3-D art


Folding, twisting, taping, looping—challenge students to find creative ways to turn paper strips into 3-D art!
Supplies:
  • 6" x 9" cardboard
  • paper strips in assorted colors and sizes
  • tape
Step:
Tape paper strips to the tagboard, accordion-folding or looping the paper to add as much dimension as possible.
End result can be something like this...let the children's fingers and imagination run wild!

Read More...

Saturday, July 28, 2012

Silhouettes Decor

Leave a Comment


  1. Tear/cut butcher paper (in any color) the height of all your students.
  2. Have them each lay down on the back on one paper (pose or no pose).
  3. Trace the outline of their entire bodies, as detailed or simple as you want.
  4. Cut the outlines of each student's silhouette, but don't forget to label their names on the butcher paper so you know who it is!
  5. Mount the silhouettes on the walls, cabinets, anywhere around the room!
  6. As the year goes by, take pictures of your students (individuals or groups).
  7. Print the pictures in black and white (print size I use is 3x5).
  8. Glue the pictures onto the students' silhouettes.
  9. At the end of the year, the students and their families have a collection of pictures from the year for them to remember and keep!
I've done the silhouettes at the beginning & end of the year.  No matter the age, the students love the end results!  It's usually my teacher gift to them!  :)  
Read More...

Thursday, July 19, 2012

Milk Art!

2 comments
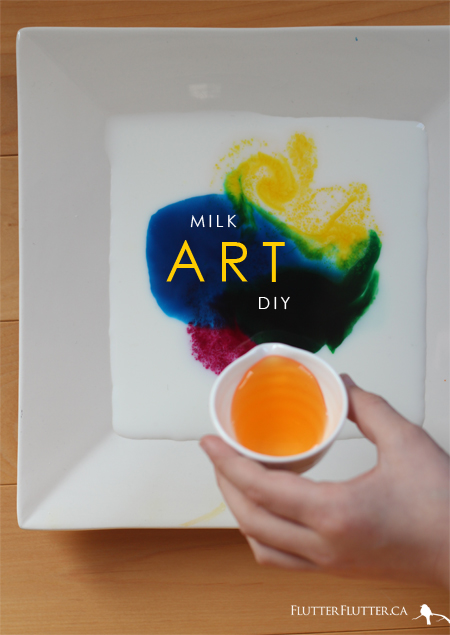
I found this cool Milk Art project from Rosa Pearson Design.  Perfect for young students!  
It incorporates science, too!  
Awesome!

All you need is 4 ingredients:

  1. shallow bowl/plate  
  2. Milk (2% or higher)  
  3. Food Coloring  
  4. Dish Soap


Have fun with your students!  Watch their eyes go "Wow!"
Read More...

Monday, July 16, 2012

Spiderwebs &/or Fine Motor Art Activity

Leave a Comment
If you ever talk about spiders and spiderwebs in the classroom (like I do, during times like Halloween), then here is a fun Spiderwebs &/or Fine Motor Activity to do with your kiddos!


The result of this colorful glue art activity will be perfect for window displays or hanging from the ceiling!
Materials:
  • waxed paper
  • food coloring
  • glitter (optional)
  • bottles of white glue or clear glue
  • craft sticks for mixing glue
  • string or yarn or hook for hanging
Setup:
Add a few drops of food coloring to each bottle of glue to tint it a different color & add glitter for a little sparkle! Stir the glue in each bottle with a craft stick until the color is blended.
Steps:
  1. Use different colors of glue to squeeze a design on waxed paper, making sure that all the glue lines are connected. Let the glue dry for two to three days.
  2. Carefully peel the design away from the waxed paper. 
  3. Tie a loop of string, yarn, or hook through the project to display the kiddos' beautiful work!
 Thanks, Mailbox!

Let your students' creativity take over!  This picture's web was made by sprinkling the glitter on top of the glue, but tinting the color & mixing it with glitter in the glue is A LOT more fun! 

Read More...

Tuesday, July 10, 2012

What You Can Do With A Cardboard Box | KaBOOM!

Leave a Comment
What you can do with a cardboard box | KaBOOM!


As teachers, we always have cardboard boxes somewhere!  Here are ideas in what to create with cardboard boxes and how to use them in your classroom!


Read More...

Saturday, June 30, 2012

KidsSoup & ABC Twiggles

2 comments
KidsSoup & ABC Twiggles are another amazing Preschool and Kindergarten resource websites I've used.  KidsSoup is colorful and easy to navigate to find the themes, lessons, printables, crafts, games...tons of fun you want to have in your classroom.  ABC Twiggles focuses purely on the alphabet through a multi-sensory curriculum, through online books and videos, flashcards, posters, worksheets, coloring pages, letter matching, word walls, chants, books, recipes, crafts, and more!  

Unfortunately, their membership isn't free, but you can get the bundle (both websites) membership for $39.99 for the whole year!  Or you can just get the KidsSoup membership for $26.99 & ABC Twiggles membership for $21.99.  I think the bundle is the best deal for all that you get!  


If not, you can always just sign up for their KidsSoup Twiggle Magazine Newsletter for free ideas!  :)
Read More...

Saturday, June 23, 2012

Helpful Fun Resources

Leave a Comment
I love these 2 books!  They easy resources to navigate and use!  
<----- This book to the left is one that will help you organize your classroom.

-----> That book to the right is for enhancing lessons and engaging your students.  

Both are awesome for teachers new and old.  You can never have too many ideas!
Read More...

Thursday, June 21, 2012

Little Bird Tales

Leave a Comment
This website looks very cool!  I have not used it yet, but I sure will with my kiddos when the new school year starts.  Little Bird Tales "captures a child's voice and imagination with  creative story building tool and share them with friends and family."  So, students can create stories individually or as a group with audio and all!  Step1: create or upload artwork; Step2: record voice to each page; & Steph3: email finished products to family and friends!  How awesome!  Best part?  It's free!  You can even sign up as a teacher!
Read More...

Sunday, June 17, 2012

Magnet Painting

Leave a Comment

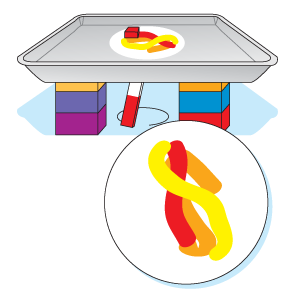
  1. Place and tape a baking sheet on two or four large and sturdy wooden blocks so that there is enough room under the baking sheet to move hands. 
  2. Tape a piece of paper onto the baking sheet.
  3. Place blobs of paint (at least 3 different colors) on the paper.
  4. Place magnet(s) on top of the paper in the baking sheet.
  5. Use one magnet underneath the baking sheet to move the magnet(s) on top around. 
  6. Voila!  A masterpiece.

Thanks, The Mailbox for reminding me of this fun little art and science activity!
Read More...

Sunday, June 10, 2012

Salt & Glue Watercolor Painting

Leave a Comment
Salt & Glue Watercolor Painting

The effect looks like the picture above.  
Ingredients needed:
1-paper
2-pencil
3-glue
4-salt
5-watercolor paint
6-water
7-extra sheet or pan to dispose excess salt

Here's how:
1-draw a design on paper with pencil 
2-trace over the pencil marks with a bottle of white glue or you can have students freehand with liquid glue on paper
3-sprinkle salt over the glue
4-shake off excess glue
5-dip paintbrush in water
6-dip paintbrush in watercolor paint
7-gently touch the paintbrush to the salt glue 
8-watch as the paint spreads into the mixture!

Read More...

Saturday, June 9, 2012

Blow Painting Faces

Leave a Comment
This is so adorable!
This is definitely an activity to do in the early childhood years.  Children practicing blowing through a straw develops and strengthens oral communication muscles, learns to understand their own strength in light and strong wind-making, plus it's just fun!
To go along with this activity, here is my top 5 recommended books to read aloud to the kiddos.

  
Thanks for the idea, Raising Sparks!
Read More...

Puppets Stage

Leave a Comment
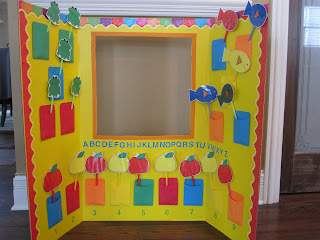
Puppets need a Stage.  Check out this DIY Puppet Stage by one of my favorite bloggers and early childhood education professional, Ms. Deborah J. Stewart, M.Ed, at teachpreschool.org.
How simple this is!  Just by using 2 foam or sturdy cardboards...
1-cut one board in half, vertically.
2-tape the two halves on either side of the other whole board.
3-cut a big square for the opening of the stage on the other board.  
4-viola!  you have a stage!  
5-decorate to your hearts content for puppets and popsicle stick figurines.  whatever a child's heart desires!

Thanks, Ms. Deborah!
Read More...